This guide shows how to install Windows Server 2016 step by step, with every setting in the order you will use it.
WINDOWS SERVERINSTALL WINDOWS SERVER 201…ENTERPRISE LABtimer 45 MIN LAB
● VALID ON THE CONFIG BELOW
dns LAB TOPOLOGY & PREREQUISITES
# example values used while writing and testing this guide
LAB VM
HypervisorESXi / Workstation
vCPU2
RAM4-8 GB
Disk60 GB thin
WINDOWS BUILD
EditionServer 2019 Std
InterfaceDesktop Experience
Adminlocal Administrator
IPstatic or DHCP
VALIDATION
RolesServer Manager
Firewalllab rules only
Snapshotbefore changes
01constructionHow to Install Windows Server 2016 in VMWare Workstation
This is a step by step tutorial to Install Windows Server 2016.
Prerequisite:
Download VMWare Workstation and Install.
Download Windows Server 2016 installer .iso file and save on your computer.
- Start VMware Workstation Pro from the desktop of your Lab computer and press ‘Create a new virtual machine’.
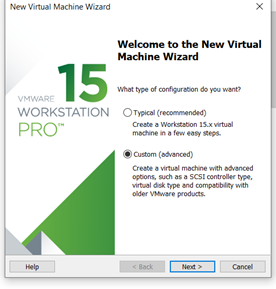
- Choose ‘Custom’ on the welcome page and click ‘Next’
- Select Workstation 15.x for Hardware compatibility and click ‘Next’.
- Select ‘I will install the operating system later’ and click ‘Next’.
- Select “Windows Server 2016” for the guest operating system and click ‘Next’.
- Name the machine LON-DC and for the location choose an empty directory on your disk.
- Click ‘Next’ on all the following screens until the ‘Network Type’ appears. On that screen choose ‘Host Only’ and click ‘Next’.
- Select ‘Create a new virtual disk’ and click ‘Next’.
- Click ‘Next’ on all the following screens until the ‘Select a Disk’ appears Select ‘Create a new Virtual Disk’ and click Next.
- Select ‘Store virtual disk as a single file’ on specify Disk Capacity screen, click ‘Next’.
- Click ‘Finish’.
- Click on CD/DVD on the property sheet and select ‘Use ISO image file’; browse and select the Windows Server 2016 iso file from your disk and press Ok.
- Power on this virtual machine. If the following screen shows up, press ‘Enter’ and ‘Enter’ again to boot rom CD and start the installation.
- Select ‘English Canada’ Then ‘I do not have the key’ and select ‘Data centre with desktop experience’.
- Choose ‘Clean Install’ and on the next screen press ‘Next’.
- Enter Pa$$w0rd on the following screen and press ‘Finish’.
- Press ‘Control+Alt+Insert’ to create ‘Control+Alt+Del’ for the VM and enter the password (Pa$$w0rd) to login.
- On VM Menu select ‘Install VMware Tools’ and follow instructions on the bottom yellow bar. Then install ‘Complete’ tools. When asked, restart the machine.
- In the search box (beside the Windows ‘Logo’) on the virtual machine type gpedit.msc, and run the Group Policy Editor.
- Expand Administrative Templates on Computer Settings, select system and drill down to the shown item.
- Right click on it, select edit, click disabled radio button and press OK. Terminate gpedit. From now on it will not ask you why you are turning the server off.
- From now on you will use the Server Manager’s Local Server
In short, to install Windows Server 2016 reliably, follow the order above and verify each step.
▶ UP NEXT IN THE WINDOWS TRACK
rocket_launch Launch Next LabHow to Install Windows Server 2016 in a Virtual Machine
Finish this lab, then continue down the track. Each guide builds on the one before it.