How to Install and Configure DNS Server in Ubuntu
Here is a step-by-step guide to install a DNS server in Linux (Ubuntu).
Install DNS server (Bind9)
First, Log in into your ubuntu machine and go to the terminal by right clicking on the desktop and then open in terminal. You will need the IP address of the machine. So, check the ip address first with the command.
ip -a
Then, make sure you machine has Internet connection. Setting a Network card of the VM in NAT mode and use “Obtain IP address automatically (DHCP)” in the OS typically allows internet connection . Then from the terminal window, use the command
sudo apt install bind9
Press y to continue
Check if bind9 (DNS) was installed by using the command
named -v
Next, you can go to the folder /etc/bind by using cd command and list the files by using ls command. Some of the files in that folder will be modified to configure bind 9.
cd /etc/bind
ls
Then, check the status of the machine by using the command
hostnamectl status
It will show the computername/hostname and OS version (with other information).
Note that, in this document I will use following values in examples. You must use the values that are applicable in you case.
computername : nh-ubuntu20
domainname : nurul.local
IP : 172.16.0.15
Gateway : 172.16.0.2
Update /etc/hosts file
Then, edit the file /etc/hosts using an editor such as vim or gedit. If vim editor is not installed, you can install it first by using “sudo apt install vim” command.
sudo vim /etc/hosts
For editing in vim press the i key on the keyboard and then you will be able to add content in the file. Use keyboard to go left and right. Edit the lines to make the following entries. Be careful about letter case, the required spaces or extra space. As Linux is case sensitive, a common error is to use a wrong case when typing.
127.0.0.1 localhost
127.0.1.1 <computername>.<domainname> <computername>
<IP> <computername>.<domainname> <computername>
Leave the IPv6 part as it is.
Example /etc/hosts file content:
127.0.0.1 localhost
127.0.1.1 nh-ubuntu20.nurul.local nh-ubuntu20
172.16.0.15 nh-ubuntu20.nurul.local nh-ubuntu20
That’s it. Then save and exit by pressing escape key and then colon (:) and wq
Verify the file content by using the cat command
cat /etc/hosts
Then, verify hostname, domain name and fully qualified domain name
hostname
dnsdomainname
hostname –fqdn
Configure Bind 9
If everything looks fine, next you can start configuring bind9. The first you can configure is named.conf.options. List the files to make sure you are in the /etc/bind folder and the named.conf.options file is in the current location. Before make any changes, make a backup copy of this file by using cp command, in case things go wrong you can get the original. When you are already in the folder where the file is located, you don’t need to use folder name, just use the file name.
sudo cp named.conf.options named.conf.options.orig
That will keep a copy of the original file. Then you can edit the file using vim editor.
sudo vim named.conf.options
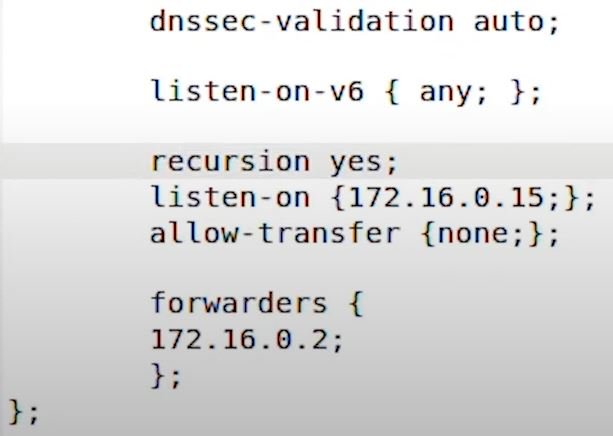
To go to insert mode press i on the keyboard then add few lines near the bottom of the file, before the last line “};”
recursion yes;
listen-on{<IP>;};
allow-transfer {none;};
forwarders {
<Gateway IP>;
};
Example content in named.conf.options file:
Save and exit by pressing escape key and then colon wq.
Next, keep a copy of the file called named.conf.local by using the cp command.
sudo cp named.conf.local named.conf.local.orig
Then use an editor to edit the file named.conf.local
sudo gedit named.conf.local
Write information for the forward lookup zone file and reverse zone file for your domain.
In the following example, I am going to use “db.nurul.local” filr for the forward lookup zone and “db.0.16.172” file for the reverse lookup zone file.

Save the file and exit.
Use the following command to verify there were no error.
named-checkconf
Create forward lookup database
Next, create the records in the forward lookups zone database and reverse lookup zone database. You can make a copy of db.local file and edit the copy to create your database file. You can check the database file name you specified in the named.conf.local file using cat command.
cat named.conf.local
Copy db.local to the forward lookup zone database file specified in the named.conf.local file (I used db.nurul.local)
Note: I will use following values in examples. You must use the values that are applicable in you case.
forward lookup zone file: db.nurul.local
forward lookup zone file: db.0.16.172
sudo cp db.local <your database file name>
sudo cp db.local db.nurul.local
Edit the database in your database file. In my case:
sudo gedit db.nurul.local
Add SOA record, NS record, host record, and MX records. Following figure shows my example. Make sure you use your IP, and domain name.

Save and exit.
Then check the named-checkzone by using the command for errors in the database file.
named-checkzone <forward lookup zone name> <database file name>
named-checkzone nurul.local db.nurul.local
Create reverse lookup database
Copy db.127 to the reverse lookup zone database file specified in the named.conf.local file (I used db.0.16.172) and edit the new file.
sudo cp db.127 db.0.15.172
gedit db.0.15.172
Create SOA record, NS record, pointer records. Following figure shows my example. Make sure you use your IP, and domain name.

Save and exit.
Then check the named-checkzone by using the command for errors in the database file.
named-checkzone <reverse lookup zone name> <database file name>
named-checkzone 0.15.172.in-addr.arpa db.0.15.172
Use the named-checkconf command for errors, if there is any.
named-checkconf
Restart bind9 and check its status to make sure the service is active.
sudo service bind9 restart
sudo service bind9 status
check nslookp for the domain by using the following command.
nslookup <your fqdn for www>
nslookup www.nurul.local
Update Name Server and Save permanently
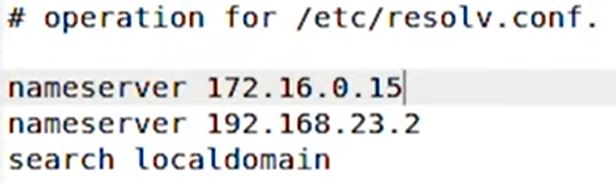
In the result, the server IP might not be your server IP. It that case check the name server in the /etc/resolv/conf file
cat /etc/resolv.conf
Finally, to permanently save the name server, first delete the file.
sudo rm /etc/resolv.conf
Then, link the /run/systemd/resolve/resolv.conf file to /etc/resolv/conf file
sudo ln -sf /run/systemd/resolve/resolv.conf /etc/resolv/conf
Then, edit the /etc/resolv.conf file and update the name server for your DNS server IP in the first line and save.
sudo gedit /etc/resolv.conf
use nslookup command again to check if the server IP is reflected.
nslookup <your fqdn for www>
nslookup www.nurul.local
Now ping to your FQDN for www (or any other host or CNAME) should get a reply. After you restart the machine, you should be able to ping to any valid address of your domain.
If you are using Ubuntu 18.04 or older, update the /etc/nsswtich.conf file and update hosts: line. Move the word dns right after files.
![]()
After you restart the machine, you should be able to ping to any valid address of your domain.
End.
For More videos, please visit the channel: https://www.youtube.com/@NurulHudaTechTalk